Analytics

Showing posts with label TPT. Show all posts

Tuesday, October 20, 2015

Fun Fall Finds- The Crucible and Ergotism

Fall always reminds me the most of school. Even though my school year seems to start earlier every year (we start at the beginning of August!) 

San Diego hasn't felt much like fall (we've had TONS of hot hot heat) but my school year is definitely in full swing.

This fall thirteen bloggers have come together to offer you the chance to win 13 different products  or a TPT Gift Card.


In October, I get to teach one of my student's FAVORITE stories to discuss: The Crucible!

Click above to find it on Amazon
Students LOVE the blame game, the sexual scandal, the girls being crazy, and of course, they all love to hate Abigail.

The play is also a GREAT chance to bring some non-fiction into my classroom. We read real tales of persecution that happen worldwide now. We look into the effects of peer pressure and authority. We investigate the real identities of the names that Miller borrowed for his characters.

At the end of the year students select where the blame for the witch trials goes using evidence from the play. While many students usually take the easier root of placing the blame on Parris, or Abigail. However, a surprising number of them choose to place the blame on ergot!

Ergot is a fungus that  some researchers have found could be the source of the accusations in Salem. Students really connect to this opinion. It is physical enough to make it easy to understand, yet the science of it makes them really work at it.

For this blog hop I am offering the chance to win this worksheet to help your students learn about this strange fungus and apply that knowledge to the Crucible. It includes a graphic organizer to help them organize their thoughts to answer the prompt, and multiple choice questions based on those seen in the 2016 SAT. This is especially a nice topic since the SAT is integrating more science based texts.

My junior students find it challenging, but it is the one that resonates the most with them. Plus, it involves crops and witches; perfect for the season of fall.

For those of you not lucky to win the contest (which runs from the 20th-25th) you can buy this on TeacherPayTeachers for just $1.50!

Enter the contest below, and then check out some of the other blog contributors to see their great stuff!


Monday, September 28, 2015

Why mELTing?

Here's a quickie!

Art with Jennie K started a great linkie where TPT educators share what the background behind their logo is.

About two years ago I shared a blog explaining why I changed my name. My blog used to be called Trying to Teach, and I made the leap to mELTing Activities to show the attitude of the blog was changing.

My hope was, and always has been to share activities that other people can "melt" and make their own. BONUS there's an ELT (English Language Teaching) in the name, which makes it super convenient.

I am still going through the process of changing everything over to one name (Blog, Facebok, Twitter, etc.) but for now I really like my logo :)

Check out the other linked up authors at this InLinkz Link-up

Tuesday, August 4, 2015

Graphic Organizer Station

I've said it before, but I'll say it again, I was NEVER a huge fan of graphic organizers. they just didn't work for my brain. Nonetheless, I completely recognize how they help students sort through the ideas going through their brains. Often in class we'll all do a graphic organizer together, but I also know some students who would like to use them more than others.

Thus, I introduce you to: My graphic organizer station.

Nothing fancy, I think I got the "File Purse" at Target and the manila files I scavenged from a teacher who was retiring.

Some of the graphic organizers are ones I've created myself (like the Venn Bow Tie) but a lot of them I got from Love Learning with Liana's store. It has eight different graphic organizers and they each made the cut!

Let's take a closer look at my station

Fancy tape = Decorating :P
1. Before anything else, admire my plant. It has been two weeks and it is still alive!!!

2. It has a quick note on what graphic organizers are and that they may be used any time a student thinks it will help. No fancy font, but I used some gold tape, so that counts as being decorative, right?

3. IMPORTANT It has a note about what to do when they take the last graphic organizer. They are to hand me the empty folder (or put it on my desk) so I can make more copies before the last class.

But how am I supposed to know what copies to make from a blank manila folder? I am glad you asked.

Labeled Tabs
Worksheets taped to the front
4.   In addition to the "title" of the graphic organizer written on the tab (yes I have the handwriting of a five year old boy), I also have the worksheet itself taped to the front of the folder. That way I know EXACTLY what worksheet I'll need to make copies of. This is important because I have several copies of slightly different graphic organizers. 


Compare and Contrast 1
For example you can see the I have three different compare and contrast worksheets. One (above) is just columns for the students who don't really like graphic organizers, but know they need to sort their thoughts.  To the left you can see I have the standard Venn Diagram (from Liana's packet). However, if you follow this blog at all, you'll know I am not a fan of Venn Diagrams, so I also have my Venn Bow Ties (below). 

Since these are all about what helps the student the most I provide all of these options and students can pick the one that works best for them.
Compare and Contrast 2

While the main idea of these worksheets is to help students help themselves, you can also use it as an easy way to differentiate a class. If you know one student struggles with finding the author's purpose, and you know that's a task they'll be doing in class, hand them a copy on their way into class (or while they are working). They'll appreciate it, and they'll be better equipped to answer the question when they get to it. 

Any graphic organizers I am missing?  Do you have a graphic organizer station in your class?

Looking to stock up on some organizers yourself?  You can grab my Venn Bow Tie for free here and Liana's are currently free (no idea how long that will last) here.

Monday, June 29, 2015

TPT Seller Challenge: Teenage Dreams

As a teacher I work a lot. I am sure this isn't news to anyone, but I often share Instagram photos of my car being the last one in the parking lot, checking out the sunset over my classroom, or grading poolside. I don't mind the work, most of the time, I like taking the time to create things that my students will really learn from and hopefully even enjoy (though there are some who would never admit it!)

So GOAL 1:
I have lofty ambitions of having the "perfect" classroom. I am not as craft as other teachers, so it will cost a bit more to achieve the class I want to have, but I believe that having this space will make my class something special, and help students really focus on learning! In short, I hope that I am never hesitant to buy something for my class or to take a class that would help me because of cost.

GOAL 2
The financial benefit is psychological to me. I hope that by making some extra cash TPTing I work a bit harder on making my products perfect.

When I teach I have a theory that students need to get their work out of the class. When we do something just for our little world, we don't really put as much effort or take as much pride in it. The same thing happens with me as a teacher. Just having MY class do my projects and assignments is one thing, but knowing that other teachers will use helps me work my best to really put together great project!

GOAL 3

I am late to this challenge because I really felt like my goals and dreams weren't fitting in with the goals and dreams of other teachers. I really like TPT as a way to share my work and get inspired by others. Sometimes I can buy products and save myself time. Plus I use my profits to buy them, so I don't go broke trying to create a fun environment for my students.So my goal is to continued to be inspired by other teachers and be the best I can be


Tuesday, June 16, 2015

Makeover Madness - TPT Sellers Challenge

OK, it is Summer! In addition to making my way through a massive pile of books I am DYING to read, I also signed up for the #TPTsellerChallenge.

First thing is first I filled out my starting stats. I just tipped 1,000 facebook followers on mELTing Activities, so I was happy to put that information in. I don't use Instagram much for my TPT stuff, but I guess it couldn't hurt to start. I use Twitter on occasion regarding my TPT products, though mainly as a way to share and brainstorm with other teachers. I used to be a Pinner, but didn't really have time for it in the last year. I had nothing to do with BlogLovin, but I do NOW :) Go ahead and follow my blog with Bloglovin.

So, this is my starting point... let's see what's to come!

Week One: "Makeover Madness."
The worksheet

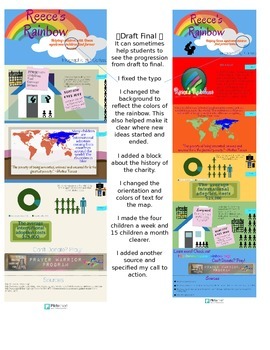
My Mission: To find one product in my store and give it a makeover. I am not very good at makeovers (on myself or my worksheets), but I figured I'd give it a shot. I stayed practical and looked for the product with the fewest conversions. That means people are clicking, but not buying. One of the lowest was this worksheet that helps students create impersonal sentences instead of personal sentences. This is something that takes a bit of practice and I find the worksheet really helps them (and is a great reference later!)

First off I figured I'd give it a catchier title, more for the students than the teachers. I suddenly got the lyrics from an old Monica song stuck in my head. "Don't Take It Personal"

Video for your enjoyment:


That made me think that this assignment isn't about taking things personally, but it is about not MAKING them personal, so I made a quick little button to add a graphical element to the worksheet, and to hopefully help this concept of writing impersonally stick with students.

I added a cover page (though it isn't as graphic as most of the cover pages I see, at least now there is something!). I also changed the fonts a bit, added a background, increased the spacing. Now it is a little less cramped and I would suggest printing it as a double sided worksheet. I also added a a personal writing assignment, so it is worth the extra space.
Comparing the original worksheet to the cover page and expanded worksheet.

It may not seem like a huge difference, but it is a start :)

I hope that this gets the worksheet in the hands of more students who will benefit, and that with time I can make it even better!

And there we are! I am really not very good at this, so any helpful hints or advice would be most appreciated! 

Thursday, May 28, 2015

Alternative to Vemn Diagrams

Anyone who watches Dr. Who knows that bow ties are cool.

Well, here's a way to bring bow ties into your graphic organizers! Why you may ask?

Maybe you're perfectly content with Venn diagrams. That's awesome! I never was. I always felt they were very awkward and didn't give me enough space to express myself.

Check out this video for more on my hatred, and alternatives to the standard Venn Diagram, including the Venn Bow Tie... because Bow Ties are cool.


For anyone wondering why I am comparing Mean Girls and Julius Caesar, check out this post where my stduents make infographics exploring the similarities and differences between the movie and the play.

As promised in the YouTube description, if you go to Teachers Pay Teachers you can download a free worksheet with some sample pages. Try them out, and let me know what you think.

Most importantly, if you have other graphic organizers that you love, or if your students like the Venn Bow Tie, let me know :)

Wednesday, February 11, 2015

Infographic Project - Charity Based Research

My students have done infographics before to practice argumentation and essay structure. This project uses infographics again, but this is a different project that is much more non-fiction and research based.

This project has tons of technology and websites.

I am really excited about it, and about being able to post about it. In total the charity infographic project took three classes, but there was very little homework. I am listing all the steps together here and you can divide them as needed, take steps out if wanted, or add to it. I actually did a bit more (e.g. I worked on using notecards) but here are all of the infographic based steps:
  1. To start, I pass around a sheet of statistics on a topic we are covering: in this case GMOs.We quickly review the statistics and go over whether they are for or against GMOs. Then, I ask students how interesting that was. Most of them say not very.
  2. Using infographics I found online earlier, I show them 10 different GMO statistics we go over each infographic and decide: how does it look, how are the facts, and is it for or against GMOs.
  3. Students on their own think about what they liked about infographics, and what they didn't. What seemed to work, and what fell flat. After some individual work I let them share with a small group, and then we discuss it as a class.
  4. In small groups (2-3) students are assigned to select an infographic about anything they want. They need to know 1. Why they picked the topic 2. Why  they liked it
  5. Students made short presentations on their infographics.
    1. The goal of 1-5 is to introduce students to the topic of infographics and have them get a feel for what they like and don't like. What colors don't work well. When is too much on an infographic too much? Is white space good or bad? etc.  For me, 1-5 took one 90 minute class.
  6. Finally, I let the students know that they will be creating their own infographic on a charity. 
  7. I gave them an approved (they had to be within the guidelines of the school) list of charities and told them to pick whatever one they wanted. They could also pick a different charity, but the school administrators would need to approve it. In groups of two-three students selected a charity.
  8. We went over good sources vs bad sources (we covered this before) and I let them research away. If a student started researching and realized they didn't like their charity, they were allowed to switch.
    • My students spent an entire class researching. While some finished early, most were really working the whole class period. For fast finishers however go to step 9.
  9. After I noticed some students had quite a bit of reliable research ready, I showed them http://piktochart.com/. There are other infographic sites out there, but (for reasons I will discuss in #15) I prefer to use this one. If done researching, students could create an account and begin playing on the site.
  10. I show them an infographic that I made on a charity (I selected one they didn't choose as an example). We go over what we like and what we don't like. We look at the organization pattern, the charts, the visuals, the colors etc.
  11. Examine and review infographic assignment.  Be sure that students understand everything they are expected to do.
    • Using the rubric on the assignment have students grade my infographic.
      • I usually make a few typos, or choose a hard to read font to make sure they give constructive criticism.
  12. Give a quick tour of Piktochart. I like having students learn on their own, but giving them a good start is usually a solid idea.
    • How to sign up
    • Where to start
    • Free vs Paid
    • How to undo
    • Where to find pictures
    • etc.
  13. Allow students to work on Piktochart
  14. Have students submit their Piktochart to me. I make corrections and give it back to them. 
  15. Model Presentation (This is why I like Piktochart! Some other sites have this option as well though.)
    • Using Piktochart's presentation mode I give a presentation justifying why I selected my charity. 
    • I am always sure to make a few easy to spot mistakes so students can correct me
  16. Have students grade my presentation
  17. Let students create their own presentations
  18. Students present their infographics to the class
  19. While presenting, students evaluate the infographic and the quotes
  20. Finally, my students evaluate themselves.
DONE...for now. There's actually a final part, where my students raise money for the charity, but I'll save that for another post.

For now, I'll show you some of my favorite infographics my students created. Click on the charity name to see the whole infographic.

  • San Diego Hunger Coalition was a group that really took advantage of all piktochart had to offer. They had fun picking different backgrounds, and they stuck to small chunks of text (rather than writing everything down). This group was a clear division of labor. One person researched cool facts and statistics, and the other person played on Piktochart until they found the perfect look. Normally I am more a fan of collaboration (rather than divide and conquer), but this group was persistently communicating, so it seemed to work well for them.  
  • L'Arche This student really had fun with the graphics. Every block in her presentation has the same theme, and all of the visuals go with one another. She also added little details where possible. For example, one of the graphics was of a person and it didn't include eyes, so using the shape tools she added them. Her partner missed a few days of school, so she did most of the work on her own, and I was really proud of the final product.
  • Build a Miracle Group was big into incorporating the graphics into the block. That is, nothing was ever stand alone, it was almost one big picture. They also found really great facts to support donating. This group was also one of the most prepared groups when it came to donating. They really worked hard to know their stuff and came across as quite knowledgeable.
  • Finally, Las Hermanas San Diego was a really fun group! They went outside the box a bit, and used the graphics in ways that weren't normal. For example, they used rectangles as surfboards, and put people in normal clothes standing on them to make surfers! Adorable!
Thanks so much for sticking around for the whole post! This really is a fun project it helps teach students about:
  • the good charities do
  • research skills
  • visuals
  • learning how to use new computer programs
  • working in a team
  • organizing their thoughts
  • evaluating one another
  • self evaluating
And of course, the writing and speak skills I am focusing on in my speech class were there (grammar, intonation, transition words, volume, etc.)

I have the worksheets I used available for purchase at TeachersPayTeachers  if you are interested. You can also download the preview for free to see part of it.

Sunday, June 8, 2014

Some Sample Pre-Reading Questions

I've written about using simulations in the class to help students open their schemata, I've also talked about why this is important (if you missed that you can read more at this blog post). Just like you should stretch before you sprint, warming up your students' brains with some pre-reading activities is key.

Many teachers suggest you do things like look at the headlines, read the first lines, etc. I agree these are great skills, but one of my favorite things to do with fiction is get my students really thinking about the topic or theme (even before we've read the short story!).

For example, with Richard Matheson's "Button Button," an obvious series of questions would be, 
1. "If you could get a million dollars by pressing a button, would you do it?" 
2. "What if by pressing the button, someone would die?"
3."What if it would be someone you didn't know?"
4. "What if you would see them die?"
5. "What if it were a gun, but you knew they were a bad person?"
etc. etc.

You could mark one wall in your classroom as yes, and another wall as no. Ask the question then give the students a bit to choose a wall. Once they have settled ask one or two students why they feel that way. Then ask the next question. Be sure to ask some students that switched sides, and some students who stayed at the same wall.

If you think students may be influenced by their friends you could do this silently. Use the Socratic app, or have students put their head down and answer via raising their hands. 


Before asking the previous (more focused) questions some fun discussion questions would be:

1. What would you do for $50,000? In at least 50 words write about what the most dramatic thing you would do for $50,000. (For example. Would you eat a live baby octopus? Would you wash the dishes every night for a year? Would you wear the same underwear for a month?) Be sure to explain why this would be dramatic for you and why you wouldn’t do anything more dramatic.

2. Knowing only the title (Button, Button) write a 75 word teaser (usually found on the back of a book) describing what you think the story will be about.

3. Read the following headline: “Headline about wife hiring a hit man” Without knowing anything else write a news article at least 50 words long.

You could discuss these in class or assign them as writing assignments (to give students time to formulate their answers) and then go over their answers in small groups and finally as a full class the next day.

As you can see most of these questions are about the moral dilemma presented in Richard Matheson's, Button Button"

Another interesting discussion to bring in the class is, "The Trolley Problem,"


I would suggest you play the first 39 seconds of the video and ask students what they would do. Have them answer on their own, share with a partner and finally discuss it as a class. Then listen to the next 30 seconds where people give their answers in the video and the video explains why most people answer this way. Starting at 1:06 they explain the second scenario. Listen to this and stop the video at 1:37. Ask the students what they would do? MOST students will change their minds. See if you can figure out why. Then listen to the rest of the video.

Even though the scenario is quite different than "Button Button," we can get our students' minds prepared for the moral dilemma in, "Button Button," by having them listen to this problem.

If you end up using Button Button in your classroom, you can get more writing prompts to be used during or after reading at Teachers Pay Teachers. It is a great short story to get your students thinking about morals and ethics!

When creating your own activities I would advise you 1. Figure out what you want your students to be thinking about when reading 2. Figure out what may be difficult for them to read (vocabulary, grammar, idioms, etc.) 3. Think of what they need to know to best understand the story.

That's it! Once you have thought about what you want them to know, you can figure out the best activities to do before you read. Best of luck!

Thursday, May 22, 2014

Interested in Making Dream Flags?

I am leaving ITESM in about a month!

As such I am putting together packets to pass onto teachers who will be teaching the levels I teach.

One of these packets is the Dream Flag Project!

I really think that the Dream Flag Project is an amazing opportunity to get your students connected internationally.

If you are interested in starting I am offering the packet for free! I believe that ANYONE who wants to should have the chance to be involved and this is my chance to help :)

You can download and view the packet below or download it from Teachers Pay Teachers (if you haven't registered yet you can do so here)

It contains too much information (some worksheets you can certainly skip) but it gives you plenty of options.

Dream flag 101 from Carissa Peck

I really hope you take part of this project and that your students enjoy it as much as mine have! 

Monday, October 28, 2013

Videos and Participial Phrases

This blog is written for the 36th edition of the ELT Blog Carnival focusing on how to use videos in education!
 
I've talked about using videos with participle phrases before with music videos. This blog will talk about another way I like to use videos with participial phrases.

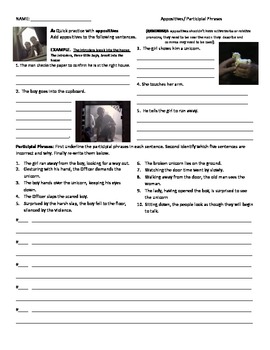
Some background. This lesson is designed for high school students whose overall semester has covered multiple themes of tolerance (e.g bullying). They have been introduced to the topic of participial phrases and appositives and this activity is to help them practice adding them to normal sentences, finding errors in sentences and producing their own sentences.

This movie is in German, but I find that works well with my students because the dialogue is limited (only 6 phrases) and they focus more on the actions (useful for participial phrases!). It is also really brief (just 3 minutes!) meaning you can play it a few times without eating into your class time too much. If you study the holocaust at all with your students this is a really great video to incorporate into your class.


Click the pick do download the worksheet
Register for free here if needed
The lesson:

  1. Show the students the video. Have them describe the different characters. Using these descriptions have them re-write the sentences to give more details using appositives (This really works for most topics: relative clauses, adjectives, better verbs, more accurate nouns, etc.)
  2. See if the students can identify the errors in the participial phrases (normally I play the video again as they are doing this). Have them re-write the sentences correctly. (Again you can do this and focus on any grammar point. Proper verb tense, proper punctuation, word order, etc.)
  3. See if they can produce any of their own emotions using participial phrases (e.g Seeing the woman open the box made me sad.) (This can also be adjusted to have students produce the grammar point that is your focus)
  4. At the very end I assigned their project which was to take the 6 lines used in the script and make their own plot. We watch a few other videos to get an idea of how many different stories can be told with the same words if we just change the characters, setting and tone
My students tend to really enjoy making videos. We have done video adaptations for literary comprehension, but this one is fun because there is a lot of talking within the group. They really have to think about how they will make the dialogue fit their purpose. Students got really creative. In addition to the video, they had to give me a script which included actions, feeling, music, etc. It was a fun assignment and the different interpretations were very amusing.

Honestly this was one of those assignments I created because I thought it would be fun and I LOVED the video. I think in the end it turned out to be educational as well :)

Thursday, August 15, 2013

Fun video for Business idioms


We are doing business idioms today and I found this great video!


The actual cartoon starts at the 5 second mark. I used it as an attention getter. We watched the video and then went over what the idioms meant figuratively versus literally. We talked about different ways to express the same idea as the idiom. Then we went into our lesson. The students really enjoyed the video!

Since once of the idioms used was, "It's curtains for you," I also mentioned Dr. Horrible. Some students recognized the reference and laughed. The rest just thought I was crazy.

You can grab a simple free worksheet (which includes the transcript) here at TPT. If you don't have an account it is free to create one; just register here!
Related Posts Plugin for WordPress, Blogger...